miercuri, 4 aprilie 2018

Bulk users accounts handling with Powershell

When you look at the daily life of a sysadmin you will always have to handle some user accounts, either creating them or assigning to groups, give them proper rights and even deleting or disabling them. Of course, any occasional account operations are the easiest part of the job.
What happens when you meet with a situation when you need to process a very big amount of them ? You can always start the mundane task of doing the same set of clicks and drags for a hundred times, just wondering how fast you can move, or... do it the easy way: Powershell.

If you have to deal with thousands of accounts and there's a massive change that involves a big chunk of them, it can become very handy to get used to some simple scripts that can help you save a lot of boring work.

So we start with the following scenario to elaborate on this: let's say you have an older software solution that requires some lots of users to have access to some resources, and that makes them belong in a certain AD group. And then, there is some new software solution going to be implemented and this requires moving some users from the old solution to the new one. It might be a pilot that requires test users, multi-phase implementation, massive promotion and so on.
Basically, you need to move a subset of user accounts from an AD group to a new one, based on a certain criteria.
This will be made in a few simple steps:
  • build or export a CSV containing a column filled with all needed users' Distinguished Name and be sure the first line of your CSV holds the description of the fields below it. In the following example te first line of the CSV is supposed to contain "SAMACCOUNTNAME" but you can call it "SAM" or "DN" or even "JACK" if you like it. The secret is to use the exact reference later in the script.
  • opening the PS console you should then first import the CSV into an array:

$userlist= Import-Csv C:\Temp\CSV_Users_List.txt
  • then you need to make two more variables that contain the initial group from where you need to remove the accounts and the new group that will need the accounts added. Be sure that the actual lines will point th the exact Distinguished Name of each group.
$grouptoremovefrom = "CN=OldGroup,OU=OldOU,DC=xxx,DC=xxx,DC=com"

$grouptoaddto = "CN=NewGroup,OU=OtherOU,DC=xxx,DC=xxx,DC=com"

  • now you can trigger the actual moving of the whole bunch of accounts. It involves removing from the old group and adding to the new group and it is done like this:
foreach  ($user in $userlist) { Remove-ADGroupMember -Identity $grouptoremovefrom '
 -Members $user.SAMACCOUNTNAME -Confirm:$false}
foreach  ($user in $userlist) { Add-ADGroupMember -Identity $grouptoaddto '
 -Members $user.SAMACCOUNTNAME -Confirm:$false}

Observations:
- you can use the quote character to continue a command on the next line or you can remove it and place the whole command on the same line.
- foreach is used to parse the entire array held in $userlist variable and takes each account stored there one by one
- -Identity switch passes the name of the group that is held in $grouptoremovefrom and $grouptoaddto variables
- -Members switch passes the current account Distinguished Name to the actual command to remove or to add the specified account from/to the group
- -Confirm switch is used to avoid confirmation for each account

In order to keep track of the changes you can count the number of the accounts stored in the $userlist variable, count the number of accounts in each group before and after running the script. To do that you can use the following:
$userlist.Count
$oldgroup = Get-ADGroupMember -Identity $grouptoremovefrom
$oldgroup.Count
$newgroup =  Get-ADGroupMember -Identity $grouptoaddto
$newgroup.Count

It might seem a little elaborate but putting it together it looks just like that:
$userlist= Import-Csv C:\Temp\CSV_Users_List.txt
$grouptoremovefrom = "CN=OldGroup,OU=OldOU,DC=xxx,DC=xxx,DC=com"
$grouptoaddto = "CN=NewGroup,OU=OtherOU,DC=xxx,DC=xxx,DC=com"

$userlist.Count
$oldgroup = Get-ADGroupMember -Identity $grouptoremovefrom
$oldgroup.Count
$newgroup =  Get-ADGroupMember -Identity $grouptoaddto
$newgroup.Count

foreach  ($user in $userlist) { Remove-ADGroupMember -Identity $grouptoremovefrom '
 -Members $user.SAMACCOUNTNAME -Confirm:$false}
foreach  ($user in $userlist) { Add-ADGroupMember -Identity $grouptoaddto '
 -Members $user.SAMACCOUNTNAME -Confirm:$false}

$userlist.Count
$oldgroup = Get-ADGroupMember -Identity $grouptoremovefrom
$oldgroup.Count
### should  return the initial count - userlist.count
$newgroup =  Get-ADGroupMember -Identity $grouptoaddto
$newgroup.Count
### should  return the initial count + userlist.count

Putting it together does not seem as hard and will sure not be as boring as processing hundreds of accounts manually.
What do you think ?

duminică, 3 iulie 2016

Holiday time


Since is holiday time (yuppie), I thought to make a theme shift, just to show IT guys don't always spend their time crunching data or tinkering with hardware.
So here you can see my first attempt to get some underwater footage using the new aquired Rollei S-50 ActionCam.


Second footage. No music this time so closer to real feel, you can actually hear the bubbles :)

miercuri, 9 martie 2016

GUI vs. console - MinShell

When it comes to arguments between linux and windows followers, one of the main items brought to the table mostly by linux fans is the professional look of the linux console, operated by command line, opposed by rich graphics of the windows interface. Of course we are talking here about server flavors and not desktop ones.

The linux console offers a powerful set of commands that (assuming one knows the syntax and area of coverage for most of the common commands very well) will let you do almost anything you want, keep a strict control of what is running and what it does and will keep same strict control over resources like CPU load and memory used, but operating it requires more knowledge and skills.

On the opposite side, a typical Windows Server deployment will offer you a lot of features brought by the Graphic User Interface (GUI), a desktop experience that allows you to easy configure roles and services, even for less seasoned professionals. The easy part is balanced in this case by fewer options and more resource consumption. Basically you instruct the server to play some roles that you want it to but you have no strict control since some so called "next-next-finish" wizards make some decisions on your behalf. And all of this at a higher resource consumption. As a footnote, since I am also using linux on daily basis be sure I will not praise Windows for what it's not worth.

Of course most of the people interested in this matter have heard about the "core" option when installing a Windows Server. But, be serious, how many of you tried to operate a core version of Windows for production purpose ? For a core Windows Server to operate effectively you will need to be a real wizard to replace all the background operations behind the so called "next-next-finish" procedure. Be sure it can be done by using PowerShell but I have seen or known of far more share of linux gurus that PowerShell wizards. The PowerShell part will be covered in another series of posts so, if interested, stay around.

Now what do you think about a flavor of Windows that will be easier to operate than the core version,  but is very close to it, also retaining a minimal graphic interface but have nothing to do with the desktop experience we were used to ? This is called MinShell and I think it's the best compromise between a bare console with absolute control via command line and a full GUI.

What the MinShell brings:
  • fewer resources consumption (no real graphic load)
  • smaller attack surface (fewer running services)
  • smaller patch footprint (no need for extra updates)
  • Server Manager (a minimum graphic shell needed to accomplish any management tasks you need)

Now that we established the reasons why one would decide to favor MinShell over full GUI or console it is time to detail how exactly can we switch between GUI, Core and MinShell states of the operating system.

1. GUI to Core

Most of the times, when we prepare a server for holding certain roles in a production environment we can do all the setup and testing phase easier if we do it using the GUI state of the operating system. After we have it done, stable and no other changes needed, it is time to bring the system to a lower state. If further server management or re-configuration operations will be sparse then Core state will be the best choice.


01_FULL_GUI_START
FULL GUI State
16_CORE_BLACK_CMD
CORE State
 

  • The easy way to do it is using the graphic interface that is still available, by removing the graphic feats using the "Remove Roles and Features Wizard". Be aware that the reverse operation will not be that easy since you are about to remove exactly the feats that are permitting you to work in graphic mode.
So we follow the next steps:
03_FULL_REMOVE_ROLES
Open "Remove Roles and Features" from the Server Manager Dashboard
04_FULL_REMOVE_GRAPHIC_FEATS
Select the graphical features intended for removal...
05_FULL_REMOVE_GRAPHIC_FEATS_DEPENDS
... followed by some other dependant features as you can see above.
05_FULL_RESTART_FEATS
The rest is linear "next-next-finish", followed by a mandatory restart needed to update the operating system with roles and/or features you added or, in this case, removed.


  • The hard way: PowerShell method follows the same principle, identifying the GUI related features and then removing them. In order to do that you need to run powershell.exe, it will open a blue command-line console where we will issue plain text commands.

Discovering the GUI related features is done by using the command bellow:
      Get-WindowsFeature *GUI*

And the result is:
06_FULL_POWERSHELL_GRAPHIC_FEATS
Listing GUI related features
Removing those features is done by running the following commands, one at a time if you want to record and experience what happens at every step:
      Get-WindowsFeature Server-Gui-Mgmt-Infra | Remove-WindowsFeature
      Get-WindowsFeature Server-Gui-Shell | Remove-WindowsFeature
with the shorter alternative:
      Remove-WindowsFeature Server-Gui-Mgmt-Infra
      Remove-WindowsFeature Server-Gui-Shell
or even assembled in one line:
      Remove-WindowsFeature Server-Gui-Mgmt-Infra, Server-Gui-Shell
After you issue one command you will have to wait and actually see the progress:
08_FULL_POWERSHELL_REMOVE_GUI_PROGRESS
Removing feature - progress bar
And then a restart is required.
As a note, you can force a restart after the command completion by placing "- restart" at the end of the previous command line.
09_FULL_POWERSHELL_REMOVE_FINISHED_ASK_RESTART
Restarting computer as required
No matter what way you will choose, all you have on your console monitor after restart will be the pitch black screen of the Core State and a command prompt. Of course, any roles or features configured prior to Core State will still be available and working as good as they were configured to do.

2.  Core State to GUI

Once you are in Core state there is no graphic interface so we must appeal to PowerShell again. We can bring the PowerShell console up by pressing , opening "Task Manager" And then "Run new task" from the File menu, as you can see in the picture below...
17_CORE_TASKMAN_RUN

...and then call in the executable "powershell.exe".
17_CORE_TASKMAN_RUN_POWERSHELL

Once the console is open we can follow the same steps as we did before, so we identify the GUI related features but we re-add instead of removing them.

In order to do that we use the following commands:
      Get-WindowsFeature *GUI*
      Add-WindowsFeature Server-Gui-Mgmt-Infra, Server-Gui-Shell
      Restart-Computer

And have the following result:
19_CORE_ADD_FEATS_RESTART

After restart we are back to full functional GUI.


3. MinShell

As you can already guess, achieving MinShell state is possible:
  • from Full GUI by removing Server-Gui-Shell Feature but keeping Server-Gui-Mgmt-Infra
  • from Core state by adding only the Server-Gui-Mgmt-Infra and leaving Server-Gui-Shell out

>>  Still working on it. Next we will explore the looks, the benefits and setbacks of MinShell. <<


marți, 9 februarie 2016

- Breaking Mirrors -

Windows Software Mirroring - workaround for getting rid of it


  • Why no longer needed

If you are a system administrator then every once in a while you will have to handle some badly or improper configured machines. Some of them are the result of inexperienced or uninterested people but sometimes it's the passing of time and advancing of technology that renders previously good solid solutions to a state of being impractical or worthless.

Back in the days when hardware was high priced there were many people or even small businesses that didn't afford to buy fully configured servers. Disk Controllers with RAID capability were among the expensive hardware. So Microsoft took advantage of this fact and came with a basic software based solution for data redundancy: disk mirroring.

I suppose that by reaching this page you already know the background so I will not insist writing about what mirroring does, pros and cons of the software approach or how it can be implemented.

The actual hardware advances of today give us plenty of RAID controllers that fit or are even embedded in workstation motherboards and all that come at modest prices. Moreover, virtualization and cloud technologies are providing us with all the scalability and redundancy we need, to obtain previously unexpected up-times.
So, having a machine that uses Windows software based mirroring will prove today to be more of a drag and it should be replaced with a more solid and up-to-date solution.

  • Particular example

My example will follow a real life case that I had to handle about a year ago and I had no time until now to share it. I will of course skip or blur some sensitive info that I am not supposed to disclose but I will try to provide all the technical info needed to understand the procedure and successfully apply it if needed. Of course it will not have a lot of pictures, just a few that I found in my archive, but I hope it will help you as much.

First we need to define the general conditions that brought us the necessity to apply such measure.

So, I happened to stumble upon an old machine running Windows 2008 R2. This machine used to be a real, physical machine, a desktop based one that had two disks that were mirrored using the Windows software mirroring solution, in spite of the fact that those disks were of different capacities (150GB and 500GB).
Then, sometime in the past somebody thought it better be converted to virtual using VMWARE technology. And of course the P2V process was conducted using the magical, never failing "next-next-finish" style, replicating the exact improper disk configuration and having the following result:


Of course the virtual machine was migrated on a real server and the virtual disks are stored on a Data Storage with a huge number of disks, high level RAID array, hot spares, so the software redundancy became so called excessive redundancy that beside unnecessary consuming storage space is also slowing down the machine by using resources to emulate the mirroring process.
The target was to get rid of the bigger disk (500GB) , since the lesser one (150GB) was better calibrated and the used/available space was never an issue.


  • Hands-on, first trial

Since I never used software RAID on Windows platforms before I thought I should first go to our friend that lately holds all the answers, meaning some web search.
There were two approaches given for a software mirrored array, to break or to remove. The difference between them is: breaking holds the info on both sides while the remove option keeps only one volume and releases the space on the secondary disk, making it "unallocated free space". So I decided to stick with the safer one, breaking the mirror. The most clear and quick explanation came from Symantec so I have to quote here.

Most inspiring before making any decisions was taking a snapshot of the machine. That snapshot was reverted a lot of times and I advise you to do the same even if this document will spare you of all the setbacks that turned me around.

If you run a quick search about "breaking" a mirror the solution will be repeatedly obvious, within a few clicks' reach but not satisfactory in this particular case. It was something like going to Disk Management, right click on a mirrored volume and choose "break mirrored volume",

 followed by a warning:
But, no matter which of the corresponding volumes I was selecting, I was stuck with the wrong bigger disk remaining the boot one even if in theory the ideea of a mirror is to be able to use any of its members in case the other fails.
The next trial consisted on "physically" removing the 500GB disk from the machine, but that was part of the snapshot and I was not ready to give it up. Next step was to switch places between disks from BIOS, but Windows remembered its preferred disk and booted from it and it was all the same.
There were a lot of trials and fails, I don't remember all of them since a lot of time passed.

After a while I decided to use the msconfig tool to switch from the main boot device to the alternate one and set it as default boot device,
This way we make sure the 500GB disk will no longer be the primary disk from which the operating system will boot. Of course this operation needs a restart and after that we have the alternate system in charge, booting from the secondary disk. After this step any "mirrror breaking" using the GUI resulted in a new error:


  • The real catch

Was when I started browsing again for answers. Nothing could be done using the GUI so DISKPART seemed to be the answer. It is a long time since I used command line "fdisk" for dealing with disks and partitions. Since nobody seemed to point in the right direction I started to RTFM, keeping the idea that alternate boot from the disk I wanted to preserve was the line to follow.


So the next step is opening a command line using administrative rights (you should make sure you have that on the currently logged on user or use ) and then use DISKPART:

Here we can select and then see and operate on properties of disks, volumes and partitions.

What we have to do is list the disks, in case we don't know them yet:
list disk
And retrieve any useful info about them:

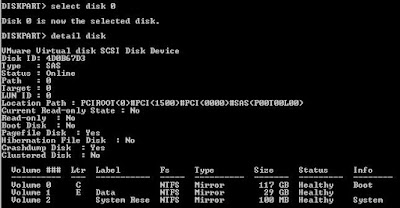
As we can see, the named DISK0 has 500GB capacity, holds volumes 0,1,2 and has no longer the boot disk attribute.
We can do the same for  DISK1 and get the following info:
As we can see, the named DISK1 has 150GB capacity, holds volumes 0,1,2 as well (mirrored) and also has the boot disk token.

First we tend to get remove of the boot mirror (volume 0), the operation that previously di not work from GUI so we go for it:

And the result can be seen from the GUI as following:
So it is, at least apparently a success. we can do the same with the data volume. But what about the hidden, letterless, puny 100MB partition that doesn't want to be rendered useless ?

I have a limited screenshots reserve from back then so I have to remember and stick to the given scenario. So after this first success we have to gather data:

As you can see the former volumes 0,1,2 are now 1,2,4, so disk0/volume0 was split from the mirror and became disk0/volume4, no longer linked to its twin volume located on disk1. It also holds the data from disk1/volume0 but it is no longer in sync and can be treated as a separate disk from the original.

The same operation will work on the "Data" volume, breaking it the same as we did before.
And here it is:
So the former volume1 on disk0 is now volume5.

But switching the boot from the Disk0 to Disk1 doesn't switch the "System" attribute from the hidden partition (as you can see above). So if we try to apply the same procedure it fails, giving us the same GUI error, "The specified plex is a the current system or boot plex.", this time in console mode, with no further details. No matter if you move the boot partition, the boot info stays in the same place.

So, it is about "boot" or "system"... but the boot part we've taken care of, now we got to bring the system down and put it into the right place which in our case is the secondary disk. If you simply remove the 500GB disk, even if you managed to move the boot in the right place, the system will not be present so it will not boot, no screenshot available for that.

After loads of searching, trying and reverting the snapshot I had to resume to a more careful studying of the DISKPART command. This command designed to work with: disks, volumes, partitions. Since all the operations until now were done at disk and volume level I was suspecting our next step should be about partitions.
If we retrieve the info about the second disk, the one we want to keep, we notice the second volume is still the one being of the type "Mirror" so this volume is still based on both drives but we will try to split them.

Remembering the error message, we have to remove the "System" attribute from the...  plex. So guessing along and passing the disk and volume level, I had to look closer to the partitions. First we have to render them inactive. You can see below that the mirrored single system partition is marked as active:, after breaking

What we have to do is deactivate it then break the mirror. In order to keep the system bootable after splitting the mirror we have to be sure we have at least one active, system partition. And, to be sure of it we must do it before deactivating the system partition. This can be done by using the bcdboot command (full syntax and examples if you follow the link).
bcdboot c:\windows /s X:

To deactivate the partition we run the following DISKPART commands:


- work in progress -


sample text
    sample text 2

sâmbătă, 25 ianuarie 2014

 Complete guide to "In-Place" Migration of a Domain Controller from Windows 2008 R2 to Windows 2012 R2


This little thing is a thanks to a friend who finaly convinced to bring online some of my work.


After an extended period of search and documenting I decided I was ready to undergo a migration of a Server holding the role of Domain Controller from Windows 2008 R2 to Windows 2012 R2.

The initial server was used in productin for over 4 years, since I managed to raise it from Windows 2003 level to 2008 R2.

Server roles: 
  • AD DS (+NTP)
  • DNS (integrated) + WINS (for older clients)
  • DHCP
  • File Server + DFS (unsuitable rolefor a domain controller, I know, but that's the way I inherited it, issue soon to be addressed)
  • Antivirus McAfee ePO -(obsolete role, already moved on other server, so not important)
Upgrade "in-place" just to grasp the concept, means to upgrade the operating system, preserving the initial file system, installed programs and configured roles of the initial server.
There are a lot of contradicting theories over the internet. Lots of people say that a proper upgrade from 2008 to 2012 must be done by installing a new server and configuring the roles all over again. There are others that say an "in-place upgrade" should be possible, with some brief info from Microsoft itself (details here). There are a few others who tried and succeeded this kind of upgrade and also briefly described . But no one so far (as of janury 2014 when the original text in romanian was published) documented such kind of process with plenty of information and pictures so I considered useful to share my experience with those who will face this kind of challenge.

Why "upgrade in-place" ?
Configuring a Domain Controller from scrap and also preserving all the initial functionality, serving the clients like no change happened, not to mention a need for a rather short window of downtime available, I think are enough reasons to avoid the alternative. And I experimented it the hard way a few years ago when I chose to do a clean install and importing/reconfiguring when I upgraded the domain from 2003 verson up to 2008. Maybe in the near future I will commit to a clean install and promote a brand new server, followed by decomissioning the current one. Given the "temporary" lack of available hardware I chose the "in-place upgrade" as the most convenient way.

How do we prepare.
First of all we make sure that any existing role on the server can be held by another server (and as alternative it's recommended to be prepared for a full restore from a fresh system or even bare-metal backup).
For holding the vital roles of AD DS and DNS I am relying on a freshly installed and promoted Secondary DC.
For the DFS role I have another two servers configured for read/only replication.
McAfee ePO role is already obsolete and planned to be removed(as I already told), all clients being migrated on another server, so it is not impacting any functionality.
So the single vulnerable role id DHCP. There is a /22 scope that has reservations and exclusions that we have to keep in mind. In case of emergency this role could be reconfigured from scrap without any trouble (keeping a last moment backup file in case the reservations/exclusions list is exhaustive would be advised).

A second mandatory step is being sure we have a full backup. There is ana alternative way that recommends a separate backup for AD database, for DHCP and so on, it never hurts having that. But, to be absolutely sure we have to be sure we have a "bare-metal" backup stored on a server with a static IP so we can reach it without an DHCP service operational. An average time for such a backup is about 20 minutes so restoring the server in case of failure would be pretty quick, having the operating system and vital roles restored very easy.( this can be the subject of another post for those interested).
The File Server role can be held by any of the read/only servers mentioned before, even if this role should not be vulnerable since the futher works will affect only the system partition and not the storage ones.

Now that we passed the prerequsites we can move to the core subject.

Steps to follow:
  • first we make sure we use credentials with administrative rights (at least domain-wide or even forrest-wide if needed)
  • apply all windows updates for bringing the system up to date (will be useful later)
  • check the AD schema to be at least at 2008 level for all servers holding the AD role. This can be done by checking a certain registry key (HKLM\System\CurrentControlSet\Services\NTDS\Parameters\), htis key can hold different values: for Windows 2008 versions the right value is 47 (during migration its value will change to 56 for  Windows 2012 or 69 for 2012 R2)
  • make sure production can be stopped and all the services described before are offline
  • run the "bare-metal" with a destination folder/server different from scheduled backups backup, exactly before proceeding
  • Inserting a DVD containing a Windows 2012 Standard kit (or other desired operating system version) making sure that the initial version supports an "in-place upgrade" (same Microsoft page as refference); be aware we suppose to have an initial operating system that has a GUI (Graphic User Interface) and we plan to migrate to one of the same kind
  • AD DS Functional Level must be at least at 2003 level to be compatible ( be aware that a domain upgraded from 2000 to 2003 and then 2008 can still have a Functional Level of 2000 !!!). For a better understanding I sugest looking at this page Understanding AD Functional levels. For raising the Functional Level in case it is needed you may also check here
  • we run X:\support\adprep\adprep /forestprep from the DVD, whare X is the drive letter of your DVD drive: 

adprep command

  • Press "C" as required and then :
adprep result

       then:
    domainprep
           Now we are sure that schema went up to 2012 level so we can start the upgrade process.
      • We are ready to run the install process directly from the existing operating system's graphic interface, right from the root of the DVD. First step will look like this:
        copy temp files
        then we choose not to apply any updates (already done in the prep phase):
        no windows update
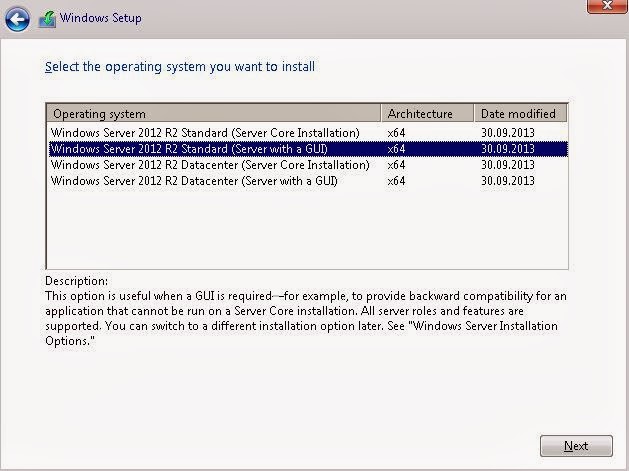
      • Then we choose the Windows version being aware of the GUI choice:
        choose windows with GUI
      • after that we choose to keep the file system, installed programs and already configured roles as they were ( remember the "in-place" concept), this choice assure no partitions will be altered so we keep the data on storage disks intact, including File Server and DFS roles:
        choose installation type (upgrade)
      • Right now the Windows install process makes sure the initial system is compatible with the new one:
        checking compatibility
      • in my case there was a particular compatibility problem consisting in some roles or features that cannot be ported on the new operating system:
        compatibility report (fail)
      • Stopping the install process and removing the said roles (asking for a restarting also):
        uninstall previously named roles
      • starting the install process again and following the same procedure we got a positive result (still having a little attention mark regarding vendors support):
        compatibility report (passed)
      • From now on the install job does its thing by copying the new files needed from the DVD disk:
        upgrading windows
      • Right now I eocountered a problem which needed further documentation:
        upgrade failed, reason McAfee
      • This was a little setback but after a quick search I found the McAfee antivirus client as being the cause. Beware, other antivirus, firewall or third party security tools may bring the same results. Disabling the antivirus client was the solution so... 
      • I remember thinking "third time's a charm" and restarting the install process again
      • From now on all went smooth. At some moment the RDP connection went down so I used the KVM console instead, just to be sure I got no more unexpected flukes.
        Upgrade succeeded (McAfee disabled)
      • There were a siries of restarts, no human intervention required. Still no RDP connectivity, all lasted about 30 minutes. I was still not sure of a positive outcome:
        finalizing your settings
        upgrade finished
        operating system start
      • Finally I got RDP control over a new server that looked like a normal, stable and reliable one.
      • At this point I was sure the operation was a successeven if some aspects still needed to be addressed !
      • Post-upgrade: identifying some issues at a first glance:

      some issues after start
      • that needed attention...:

      DHCP service not started
      ...some services that do not start and a presumed DHCP reconfiguration needed (remember it was the only sensitive, non-redundant and vital role) so I followed the steps given by the operating system itself:
      DHCP post deployment configurationDHCP post-install configuration wizard - description
      DHCP post-install configuration wizard - authorization
      DHCP post-install configuration wizard - summary


    • Once the DHCP problem was solved it all came back to normal. The other non working services were in fact set to start with delay:
      finished - all green
    • All the process lasted for about 3 hours and in the end it was all fully functional, all roles reinstated and replication with the secondary working like no change was made.

    • Operation was completed on 18.01.2014 between 6:00pm si 9:30pm (including preliminary phases) and after that we made thorough checks between 11:00am si 3:00am and the conclusion was the process was completely successful.

      I hope this detailed documentation of my work would prove to be a real help for many fellow system administrators and I am pretty sure it was the first of its kind, at least at the time the original was issued in romanian language. Now I finally took the time to translate it so it can be of some help to non-romanian speaking people.

      If some particular issues may appear or if you think any additions should be made please feel free to post your comments and I hope we can sole them together.